Drømmer om saftige tomater full av smak, urter som danser i sollys og en personlig oase som flommer over av hjemmedyrket godhet.
Å bygge ditt hydroponiske system er ikke bare for erfarne DIY mavericks. Faktisk, med litt veiledning og riktig tilnærming, kan selv nybegynnere botanikere dyrke sitt hydroponiske paradis.
Vi skal navigere i de to mest nybegynnervennlige hydroponiske systemene – dypvannskulturen (DWC) og Ebbe og Flow System.
Før vi begynner: Velge systemet ditt
La oss utforske de to systemene vi skal bygge:
Dypvannskultur (DWC): In DWC, planterøtter dingler i en næringsrik løsning, konstant badet i oksygen takket være en luftpumpe. Enkel å sette opp og vedlikeholde, DWC er ideell for grønne blader og urter.
Ebbe- og strømningssystemet: Dette systemet oversvømmer og drenerer med jevne mellomrom vekstbedet, og etterligner den naturlige stigningen og fallet av tidevann. Dette oksygenerer røttene og forhindrer oppbygging av næringsstoffer, noe som gjør den egnet for et bredere spekter av planter, inkludert frukt og grønnsaker.
Bygg ditt DWC-system
DWC-systemet er et populært og brukervennlig hydroponisk system. Planterøtter er nedsenket i oksygenrikt vann, slik at de kan motta rikelig med vann, næringsstoffer og oksygen. Dette systemet krever en luftpumpe og en luftstein for å opprettholde oksygennivået i vannet.
Materialer:
Luftstein
Luftpumpe
Jeg kan ikke
Reservoar (som en veske eller bøtte)
Næringsløsning (hydroponisk formel)
Kniv for kutting av skumplastplattform
Polystyrenskum til bruk som flåte
Voksemedium (steinull, leirstein)
Timer (valgfritt)
Trinn:
1. Klargjør reservoaret: Bor hull i lokket for luftstein og nettgryte. Sørg for at vannstanden ikke vil senke plantestilkene.
2. Injiser næringsløsning i reservoaret: Bland konsentratet i henhold til produsentens instruksjoner og fyll til en dybde på 30 centimeter eller dypere.
3. Sett inn luftstein og nettgryte: Senk luftsteinen i vann og fest nettgryten i hullene på lokket.
4. Kutt polystyrenskum for å lage en flytende flåte, plasser den omtrent 3 centimeter under toppen av beholderen eller reservoaret. Skjær hull i skummet med tilstrekkelig mellomrom.
5. Injiser vekstmedium i nettpotten: Plasser planterøttene forsiktig i vekstmediet, og hold stilkene over vannlinjen.
6. Plasser planten i nettpotten, sett deretter nettpotten inn i hullene i skumplastplattformen. Nettpotten lar planterøttene vokse fra bunnen og sidene, noe som gjør det lettere for dem å få tilgang til næringsstoffer og oksygen.
7. Koble til luftpumpen og timeren (valgfritt): En timer aktiverer automatisk næringstilførselssykluser.
Bygg ditt Ebb og Flow System
Ebb og Flow-systemet er mer teknisk og komplekst, men det tilbyr også større allsidighet. Dens funksjonalitet innebærer periodisk vanninnstrømning og utstrømning fra reservoaret basert på plantens behov, vekstsyklus og jevn temperatur.
Under innstrømningsprosessen strømmer oksygenrikt vann gjennom systemet, og gir vann og næringsstoffer til plantene. Når det dreneres, går næringsløsningen i vannet tilbake til reservoaret for gjenbruk, noe som krever at en pumpe senkes ned og drenerer vekstbrettet.
Materialer:
Reservoarbeholder (tote, bøtte)
Plantebed (plastbeholder,
PVC-rør)
Sifonklokke og stigerør
Pumpe og timer
Voksemedium (leirestein, perlitt)
Nettgryter og lokk
Trinn:
1. Lag plantebedet: Bor hull i bunnen av beholderen for drenering. Hvis du bruker PVC-rør, koble dem til med albuer og tees for å danne et rutenett.
2. Installer sifonklokken og stigerøret: Plasser sifonklokken i bunnen av reservoaret, og stigerøret strekker seg over vannivået til plantebedet.
3. Koble til pumpen og timeren: Pumpen skyver næringsløsningen opp i stigerøret og senker plantebedet. Tidtakeren kontrollerer syklusen med flom og drenering.
4. Fyll plantebedet med vekstmedium og nettpotter: Følg trinnene for å sette opp et DWC-system og plasser nettpottene oppå vekstmediet.
Vedlikehold av ditt hydroponiske system
Overvåk næringsinnhold og pH: Test løsningen din regelmessig og juster den for å opprettholde optimal plantevekst.
Hold systemet rent: Bytt ut næringsløsningen regelmessig og tørk av utstyr for å hindre algevekst.
Beskjær plantene dine: Regelmessig beskjæring oppmuntrer til sunn vekst og forhindrer overbefolkning.
Kjøp kontra bygning
For å være ærlig er ikke alle en DIY-entusiast. Selv om det kan være en givende opplevelse å bygge ditt hydroponiske system, som gir en følelse av prestasjon og personalisering, krever det også tid, tekniske ferdigheter og nok tålmodighet til å feilsøke problemer.
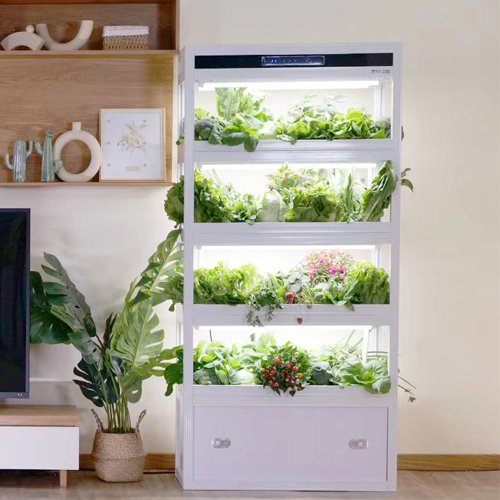
For mange entusiaster av grønnere livsstil kan presset fra elektroverktøy og PVC-rør raskt føre til visnende drømmer om hjemmedyrkede ferskvarer. Hvorfor ikke kjøpe et eksisterende hydroponisk system i stedet for å gå gjennom materialkjøp og konstruksjon?
Alt du trenger kommer pent pakket, merket og med klare instruksjoner, noe som gjør det forståelig selv for noen som pleier planter for første gang. Du trenger ikke å tyde kryptiske skjemaer eller gjette hver forbindelse.
Si farvel til frustrasjonene til gjør-det-selv-prosjekter og lekke forbindelser. I stedet kan du nyte sprø salatgrønt eller saftige cherrytomater på kort tid.
Auxgrows hydroponiske systemer er vanligvis designet med tanke på modularitet. Du kan legge til et nytt plantetårn, et annet dyrkingsskap eller bytte ut komponenter etter hvert som den grønne tommelen vokser.
Fra skrivebordsurteparadiser til vertikale grønnsakslandskap, vi tilbyr løsninger for ulike rom og ulike behov. Hvis du er interessert i våre hydroponiske systemer, vennligst kontakt oss for den mest detaljerte informasjonen.


Bonustips
Start i det små med en eller to planter for å få erfaring før du utvider ditt hydroponiske system.
Undersøk de spesifikke behovene til plantene du velger å dyrke.
Bli med online hydroponics-fellesskap for støtte og råd.
Jayes
Som Digital Marketing Manager hos AUXGROW kombinerer Jayes en lidenskap for hydroponiske systemer og ekspertise innen LED-vekstlys. Med praktisk erfaring og en dyp forståelse, guider Jayes deg gjennom en verden av bærekraftig dyrking.


